Wednesday 29 February 2012

Cloud Infrastructure Architecture Case Study – vSphere + vShield App

Original Post: http://www.yellow-bricks.com/2012/02/29/cloud-infrastructure-architecture-case-study-vsphere-vshield-app/

A white paper which I have worked on extensively has just been published. The case study takes a design / architecture approach and lists design considerations, requirements and assumptions throughout the document. I want to thank the people who worked with me on this document: Aidan Dalgleish, Frank Denneman, Matthew Northam, Venky Deshpande and Cormac Hogan. Below you can find more details… don't forget to download it! I made sure it was available in various formats so each and everyone of you can read it on its favorite device.

Source - Cloud Infrastructure Architecture Case Study

Description: The VMware Cloud Infrastructure Architecture Case Study Series was developed to provide an understanding of the various components of the VMware Cloud Infrastructure Suite. The goal is to explain how these components can be used in specific scenarios, which are based on real-world customer examples and therefore contain real-world requirements and constraints. The VMware Cloud Infrastructure Suite consists of five technologies that together expand the capabilities and value that customers can realize from a virtualized infrastructure. This case study focuses on vSphere 5.0 and vShield App 5.0.

EPUB: http://www.vmware.com/files/pdf/techpaper/cloud-infrastructure-architecture.epub
MOBI: http://www.vmware.com/files/pdf/techpaper/cloud-infrastructure-architecture.mobi
PDF: http://www.vmware.com/files/pdf/techpaper/cloud-infrastructure-achitecture-case-study.pdf

"Cloud Infrastructure Architecture Case Study – vSphere + vShield App" originally appeared on Yellow-Bricks.com. Follow us on Twitter and Facebook.
Available now: vSphere 5 Clustering Deepdive. (paper | e-book)

Monday 27 February 2012

Quickest Way to Patch an ESX/ESXi Using the Command-line

Original Post: http://blogs.vmware.com/vsphere/2012/02/quickest-way-to-patch-an-esxesxi-using-the-command-line.html

By William Lam, Sr. Technical Marketing Engineer

As you know, when it comes to automating patch management for your vSphere infrastructure, we highly recommend leveraging our vSphere Update Manager (VUM) which is part of the vSphere vCenter Suite to help simplify the update process. Though not all environments have the luxury of running vCenter Server to manage their ESX(i) hosts. An example of this could be 1-2 hosts running at a ROBO (remote office/branch office) site or single test/dev host in a home or office lab where VUM is not available.

However, it is still possible to patch/upgrade your ESX(i) host using the command-line without the need of VUM, but you will have to manually identify the patch dependencies and ensure host compliance.

Depending on the version of ESX or ESXi you are running, you may have several options that could include local and/or remote command-line utilities that are available in following four forms:

  • ESX Service Console
    • esxupdate - Local utility found on classic ESX hosts to manage/install patches
  • ESXi Shell
    • ESXCLI - Local utility found on ESXi 5.0 hosts that can be used manage/install patches
  • vCLI (Windows/Linux or use vMA)
    • vihostupdate35 - Remote utility to manage/install patches for ESXi 3.5
    • vihostupdate - Remote utility to manage/install patches for ESX(i) 4.0 & 4.1
    • ESXCLI - Remote utility to manage/install patches for ESXi 5.0 (patch capability introduced in vSphere 5 for ESXi 5.0 hosts only)
  • PowerCLI (Windows)
    • InstallVMHostPatch - Remote utility using PowerCLI to manage/install patches for ESX(i) 4.0 and 4.1

Note: If you are using vSphere Hypervisor (Free ESXi), you will not be able to leverage any of the the remote CLI's but you can still use the local CLI.

Here is a table summarizing all available command-line options based on the version of ESX(i) you are running:

Hypervisor Version Local Command vCLI Remote Command PowerCLI Remote Command
ESX 3.5 esxupdate --bundle= update N/A N/A
ESXi 3.5 N/A vihostupdate35
--bundle= --install
N/A
ESX 4.0 esxupdate --bundle= update vihostupdate --bundle= --install Install-VMHostPatch
ESXi 4.0 N/A vihostupdate --bundle= --install Install-VMHostPatch
ESX 4.1 esxupdate --bundle= update vihostupdate --bundle= --install Install-VMHostPatch
ESXi 4.1 N/A vihostupdate --bundle= --install Install-VMHostPatch
ESXi 5.0 esxcli software vib install --depot=/vmfs/volumes/[datastore]/ esxcli software vib install --depot=/vmfs/volumes/[datastore]/
Install-VMHostPatch
Or Get-ESXCLI with the local command referenced in this table.


Note: When you download patches from VMware, there is an associated VMware KB article and it provides a link to the patch management documentation. You should always refer to that for more details and information for different methods of applying a patch.

Here is an example of using esxupdate on a classic ESX host. The patch bundle needs to be uploaded to ESX host using scp or winSCP and then specifying the full path on the command-line:

$ esxupdate --bundle=ESX400-200907001.zip update

Here is an example of using the remote vihostupdate utility for an ESXi host, you will need to specify the ESXi host using the --server parameter and --username/--password for remote authenication. You may choose to leave off --password and you will be prompted to enter your credentials. The patch bundle does not need to be uploaded to ESXi host, it can reside on the system that is running the vihostupdate command. During the execution, the patch bundle will automatically be transfered to the host:

$ vihostupdate --server [ESXI-FQDN] --username [USERNAME] --bundle=ESXi410-201011001.zip --install

Here is an example of using the local esxcli utility for an ESXi 5.0 host. The patch bundle needs to be uploaded to ESXi host using scp or winSCP and then specifying the full path on the command-line:

$ esxcli software vib install --depot=/vmfs/volumes/datastore1/ESXi500-201112001.zip

Here is an example of using the remote esxcli utility for an ESXi 5 host, you will need to specify the ESXi host using the --server parameter and --username/--password for remote authenication. You may choose to leave off --password and you will be prompted to enter your credentials. The patch bundle needs to be uploaded to ESXi host using scp/winSCP or vCLI's vifs utility and then specifying the full path on the command-line:

$ vifs --server [ESXI-FQDN] --username [USERNAME] -p ESXi500-201112001.zip "[datastore1] ESXi500-201112001.zip"
$ esxcli --server [ESXI-FQDN] --username [USERNAME] software vib install --depot=/vmfs/volumes/datastore1/ESXi500-201112001.zip

Note: In ESXi 5, --depot only supports local server path or remote URL. The latter is to help centralize the location of your patches and help reduce manual transfer. This is why you need to transfer the patch to host if you do not have a patch depot.

Here is an example of using Install-VMHostPatch utility for an ESXi host:

Get-VMHost ESXI-FQDN | Set-VMHost -State Maintenance
$DS = Get-VMHost ESXI-FQDN | Get-Datastore datastore1
Copy-DatastoreItem C:\tmp\ESXi500-201112001\ $DS.DatastoreBrowserPath -Recurse
Get-VMHost ESX-FQDN | Install-VMHostPatch -Hostpath "/vmfs/volumes/datastore1/ESXi500-201112001/metadata.zip"

Note: The Install-VMHostPatch cmdlet does have a -LocalPath parameter for you to specify a local path to the patch. For larger files it is recommended you use the Copy-Datastore cmdlet to upload the file to a datastore on the host and then the -HostPath parameter as can be seen in the below example:

As you can see over the releases, we have had several methods of patching a host using the command-line both locally/remotely and it may not always be intuitive. When we converged to only ESXi with the release of vSphere 5.0, you will see that patching from the command-line has also converged to a single command-line utility using ESXCLI and a common patch format called a VIB. ESXCLI was first introduced in vSphere 4.0 and it had some limited capabilities. With vSphere 5.0, it has been significantly enhanced and now supports patching as one of it's many capabilities. The syntax and expected output is exactly the same if you execute ESXCLI locally or remotely on an ESXi host with the exception of the remote authentication that is required for a remote execution. This should provide for a better user experience and consistency going forward.

An alternative method to patching from the command-line if you do not have VUM is using VMware Go, which is an online service (SaaS) provided by VMware. VMware Go can help manage your ESXi host but it also provides a patching capability similar to that of VUM.

Get notification of new blog postings and more by following VMware Automation on Twitter:  @VMWAutomation

Sunday 26 February 2012

Technical Marketing Update 2012 - Week 08

By Duncan Epping, Principal Architect, VMware.

Technical Marketing Update 2012 - Week 08.

Many of us were still recovering this week and digesting all the discussions we had with our partners at PEX. We are also finalizing several white papers which hopefully will be posted this week. I will inform you when these are published. 

Blog posts:

Original Post: 

Friday 24 February 2012

vBenchmark - Pretty cool

I just finished downloading and installing the new fling from VMware Labs called vBenchmark.


“vBenchmark provides a succinct set of metrics in these categories for your VMware virtualized private cloud. Additionally, if you choose to contribute your metrics to the community repository, vBenchmark also allows you to compare your metrics against those of comparable companies in your peer group.”


As you can see from the screenshot, vBenchmark gives you basic information about your infrastructure and compares it to other companies in your “Peer Group”  (this is compared against All / All / Worldwide)


The ability to see how we are utilizing our environment against others so we can decide if we are over / under utilizing our pools is the main draw of this fling.


It will be interesting to see how this grows as more people start using it and what the comparison will look like at the end of each month. From the data it looks like we are defiantly under utilizing our vRAM and have over utilized the VMs per CPU (or at least to the comparison data) which is exactly what we are trying to achieve with our environment.


I encourage everyone to go out and try vBenchmark (http://labs.vmware.com/flings/vbenchmark), there is a pile more Benchmarks to compare against that may or may not be useful to you.


Poor Mans Storage Appliance (pmsApp)


I was discussing how to build a home made VSA with Jimmy Dansbo a month ago while he was attending my VMware Install and Configure training course. He had showed me some rough stages of his ideas and it was awesome. Jimmy is a very bright and clever guy, he told me he has designed his own OS years ago and I had never any doubt he would create something awesome again. This evening I've received the complete guide which describes how to build a poor mans storage Appliance (pmsApp).

VMware has released their vSphere Storage Appliance which seems like a nice alternative for small and medium sized setups to get shared storage without buying a SAN og NAS. It does however have a few drawbacks. It only runs in VMware. It is kind of expensive (you could probably buy a nice NAS for the same money).

The release of vSphere Storage Appliance did, however, give me the idea of creating a storage Appliance from open source software. The idea for pmsApp was born. The idea is that you have two (or more) virtualization hosts you want to set up in a cluster. This could be VMware ESXi, Proxmox PVE, VirtualBox or any other virtualization platform that is capable of clustering. In order to get a working cluster, you need shared storage, but you only have the local storage in each virtualization node. 


pmsApp will take local storage on a virtualization host and share it with pmsApp's on the other virtualization hosts to create shared storage that can be given back to the virtualization hosts through iSCSI or NFS. A bit more detail... Each pmsApp will join a HA cluster and export local storage as iSCSI targets. The main pmsApp in the HA cluster will join the exported storage in a sotware RAID and export that as NFS share or iSCSI target that can be used by the virtualization hosts as shared storage.

http://dansbo.dk/pmsapp/

VMware Labs presents its latest fling - vBenchmark


vBenchmark is a simple application that allows you to measure key datacenter operational and efficiency metrics. Simply connect to your vCenter Server hosts and the application provides a snapshot of these metrics for your entire virtualized environment. Have you ever wondered how to quantify the benefits of virtualization to your management? If so, please consider using vBenchmark. vBenchmark measures the performance of a VMware virtualized infrastructure across three categories:

- Efficiency: for example, how much physical RAM are you saving by using virtualization?

- Operational Agility
: for example, how much time do you take on average to provision a VM?

- Quality of Service
: for example, how much downtime do you avoid by using availability features?

vBenchmark provides a succinct set of metrics in these categories for your VMware virtualized private cloud. Additionally, if you choose to contribute your metrics to the community repository, vBenchmark also allows you to compare your metrics against those of comparable companies in your peer group. The data you submit is anonymized and encrypted for secure  transmission.

Download vBenchmark

Some interesting storage related white papers you might have missed

Original Post: http://blogs.vmware.com/vsphere/2012/02/some-interesting-storage-related-white-papers-you-might-have-missed.html

A short post simply to highlight some white papers published recently which you may have missed:

  1. vSphere Storage Appliance Technical Deep Dive
    A deep dive on the vSphere Storage Appliance, covering networking, storage and clustering architecture.
  2. VMFS-5 Upgrade Considerations
    A look at the differences between a VMFS-3 upgraded to VMFS-5 vs. a newly created VMFS-5 volume.
  3. VMware vSphere Distributed Switch Best Practices
    An excellent look at how to get the most out of your vDS by Venky. If you use IP Storage, and are considering vDS or already using vDS, this is a must read.

Get notification of these blogs postings and more VMware Storage information by following me on Twitter: Twitter @VMwareStorage

Thursday 23 February 2012

Uniquely Identifying Virtual Machines in vSphere and vCloud Part 2: Technical

Original Post: http://blogs.vmware.com/vsphere/2012/02/uniquely-identifying-virtual-machines-in-vsphere-and-vcloud-part-2-technical.html

By William Lam, Sr. Technical Marketing Engineer

In Part 1 of this article, I provide an overview of how to uniquely identify a virtual machine in both a vSphere vCenter and vCloud Director environment. In this article, we will look at an example environment and show you how to extract the information needed to uniquely identify a VM using both the vSphere API and vCloud API.

vSphere

We will begin by just looking at a vSphere environment (no vCloud Director). In the screenshot below, we have two different vCenter Servers (westcoast-vcenter and eastcoast-vcenter) and they are managing a single ESXi host each with a single VM.


If you recall from Part 1, to uniquely identify a VM in vSphere, we can use either the MoRef ID or instanceUUID. Using the following vSphere SDK for Perl script vmMoRefinder.pl (modified version of this script), we will take a look at these properties. To run the script you will need to have VMware vCLI installed on either a Windows/Linux system or you can use the VMware vMA appliance.

If you prefer to use PowerCLI then this script will perform similar actions to the Perl script.

Here is the Perl script running against the westcoast-vcenter:
$ ./vmMoRefFinder.pl --server westcoast-vcenter --username root --name MyVM1

Name: MyVM1
VM MoRe: vm-14
VM InstanceUUID: 501b8bde-95da-472a-4d2d-9d97ea394bbc
vCenter Name: westcoast-vcenter
vCenter InstanceUUID: 9B6C7A60-C60F-4C1D-A607-0A0CFA2C2D5A

Here is the Perl script running against the eastcoast-vcenter:
$ ./vmMoRefFinder.pl --server eastcoast-vcenter --username root --name MyVM2

Name: MyVM2
VM MoRef: vm-14
VM InstanceUUID: 502fb1ca-e9b8-82ae-3f9f-4a3ba85f081d
vCenter Name: eastcoast-vcenter
vCenter InstanceUUID: 63D30391-44E2-447E-A709-9DD1241C3DCC

Here is the PowerCLI script running when connected to both vCenter Servers:

Name                     : MyVM1
VM MoRef             : vm-14
VM InstanceUUID      : 501b8bde-95da-472a-4d2d-9d97ea394bbc
vCenter Name         : westcoast-vcenter
vCenter InstanceUUID : 9B6C7A60-C60F-4C1D-A607-0A0CFA2C2D5A

Name                     : MyVM2
VM MoRef             : vm-14
VM InstanceUUID      : 502fb1ca-e9b8-82ae-3f9f-4a3ba85f081d
vCenter Name         : eastcoast-vcenter
vCenter InstanceUUID : 63D30391-44E2-447E-A709-9DD1241C3DCC

Here is the same data in a table format for the two vCenter Servers:

vCenter Servers vCenter InstanceUUID VM MoRef
VM InstanceUUID
westcoast-vcenter 9B6C7A60-C60F-4C1D-A607-0A0CFA2C2D5A vm-14 501b8bde-95da-472a-4d2d-9d97ea394bbc
eastcoast-vcenter 63D30391-44E2-447E-A709-9DD1241C3DCC vm-14 502fb1ca-e9b8-82ae-3f9f-4a3ba85f081d

Do you notice something interesting about the MoRef ID for the two different VMs that are hosted and managed by two different vCenter Servers? Yes, they are the same, but you might ask why is that? I thought we said MoRef ID is a unique identifier? As mentioned in Part, a MoRef ID is guaranteed to be unique, but only within the same vCenter Server. There is a possibility of seeing duplicate MoRef ID as shown with the example above and there is also possibility of seeing duplicate instanceUUID for a VM as well.

To uniquely identify a VM across vCenter Servers, you should use the combination of the unique identifier for a vCenter Server which is instanceUUID with either the VM's MoReF ID or InstanceUUID (e.g. 9B6C7A60-C60F-4C1D-A607-0A0CFA2C2D5A-vm-14)

vCloud

Let's say we are now interested in running vCloud Director and decide to import our existing VMs into vCloud Director. You have two import options: copy or move, "copy" will create a duplicate VM in vCloud Director and "move" will just move the same VM into the proper resource pool and VM folder being managed by vCloud Director. If you want to preserve the same instanceUUID and MoReF ID of the VM as you go from vSphere vCenter to vCloud Director, ensure you are performing the move operation.

Here is a screenshot of our two vCenter Servers now in a vCloud Director configuration

If you recall from Part 1, to uniquely identify a VM in vCloud Director, we need to use the href property. We will be using the curl utility, which is normally installed on most UNIX/Linux system to interact with the vCloud API. You can also use other REST tools such as RESTClient Firefox plugin if you do not want to use curl. You will need an account with the "System Administrator" role, which is specific to a group that only a vCloud Administrator (provider side) should use.   

First we need to login to vCloud Director to retrieve authorization token that will be used throughout this example. In this example, we are connecting to a vCloud Director 1.5 instance and we need to set the header appropriately using -H option based on the version of vCloud Director you are using. The username/password is in the form of 'username@org:password' using the -u option and this will be a POST operation. Ensure you substitute the URL of your vCloud Director server. To get more information about the options used below, refer to the curl documentation or use man -k curl:

$ curl -i -k -H "Accept:application/*+xml;version=1.5" -u 'administrator@system:vmware1!' -X POST https://vcd/api/sessions

HTTP/1.1 200 OK
Date: Wed, 08 Feb 2012 23:26:12 GMT
x-vcloud-authorization: q7uX9eIAWQ0FegrrskkvTOPXiAo31wESTJ6ah5FRyE0=
Set-Cookie: vcloud-token=q7uX9eIAWQ0FegrrskkvTOPXiAo31wESTJ6ah5FRyE0=; Secure; Path=/
Content-Type: application/vnd.vmware.vcloud.session+xml;version=1.5
Date: Wed, 08 Feb 2012 23:26:12 GMT
Content-Length: 910


xsi:schemaLocation="http://www.vmware.com/vcloud/v1.5 http://10.20.181.101/api/v1.5/schema/master.xsd">


If you successfully logged in, you will get an HTTP return code of 200 and the vCloud authorization token like the above highlighted in red. Make sure you verify the version of vCloud API by looking at the schemaLocation which is highlighted above in green.

Next, to find our two VMs in vCloud Director, we will leverage the new Query API. Since we only have two VMs, we can just search for all "adminVM" without the need of filtering. If you have more VMs, you may want to craft a filter and you can find more details in the Query API documentation.

Using the authorization token return from the previous command, we now pass that instead of the username/password and this will be a GET operation to the URL listed below:  

$ curl -i -k -H "Accept:application/*+xml;version=1.5" -H "x-vcloud-authorization: q7uX9eIAWQ0FegrrskkvTOPXiAo31wESTJ6ah5FRyE0=" -X GET https://vcd/api/query?type=adminVM

HTTP/1.1 200 OK
Date: Wed, 08 Feb 2012 23:27:20 GMT
Content-Type: */*;version=1.5
Date: Wed, 08 Feb 2012 23:27:20 GMT
Content-Length: 2428

….....
    name="MyVM1" moref="vm-14" memoryMB="256" isVdcEnabled="true" isVAppTemplate="false" isPublished="false" isDeployed="false" isDeleted="false" hostName="10.20.182.92" hardwareVersion="8" guestOs="Other Linux (32-bit)" datastoreName="vesxi50-1-local-storage" containerName="MyVM1" container="https://vcd/api/vApp/vapp-0f5bdc4c-a0ec-4e6e-a8a0-cdec1bf89de0" href="https://vcd/api/vApp/vm-51201e8b-f910-40ab-b2b1-e5365a72f353" pvdcHighestSupportedHardwareVersion="8" containerStatus="RESOLVED"/>
    name="MyVM2" moref="vm-14" memoryMB="256" isVdcEnabled="true" isVAppTemplate="false" isPublished="false" isDeployed="false" isDeleted="false" hostName="10.20.182.95" hardwareVersion="8" guestOs="Other Linux (32-bit)" datastoreName="vesxi50-2-local-storage" containerName="MyVM2" container="https://vcd/api/vApp/vapp-ce7e478b-9200-45db-851b-f21657156fd2" href="https://vcd/api/vApp/vm-ab59412f-b6c8-424d-bc0e-1414e1341084" pvdcHighestSupportedHardwareVersion="8" containerStatus="RESOLVED"/>


Here is the same data in a table format for the two VMs in vCloud Director:

You should see a list of VM records found in vCloud Director and there are three properties that are of interest which are highlighted: name, moref and href. The first two are pretty self-explanatory and we can see that the MoRef ID has not changed when we performed the "move" import operation into vCloud Director. We also see the href property which is the unique identifier for a VM in vCloud Director. The reason for this is vCloud Director uses a single database and the generation of the UUID for a VM is unique and as part of the URL, it also includes the specific vCloud Director Cell address managing that VM instance.

To uniquely identify a VM across multiple vCloud Director Cells managing multiple vCenter Servers, you should use the href property.  

vSphere and vCloud

Now that we can uniquely identify a VM in either a vSphere or vCloud environment, how do we go about correlating the two and go from a VM in vCloud Director back to a VM in vSphere vCenter? Continuing from our previous command, we can retrieve more information about the VM, which will provide the necessary details to map back to a vSphere vCenter Server.

Using the href value for the VM we are interested in, we wiill perform a GET operation on the URL:

$ curl -i -k -H "Accept:application/*+xml;version=1.5" -H "x-vcloud-authorization: q7uX9eIAWQ0FegrrskkvTOPXiAo31wESTJ6ah5FRyE0=" -X GET https://vcd/api/vApp/vm-51201e8b-f910-40ab-b2b1-e5365a72f353

HTTP/1.1 200 OK
Date: Wed, 08 Feb 2012 23:28:14 GMT
Content-Type: application/vnd.vmware.vcloud.vm+xml;version=1.5
Date: Wed, 08 Feb 2012 23:28:14 GMT
Content-Length: 14519

….....


               vm-14
               VIRTUAL_MACHINE
          
          
               href="https://vcd/api/admin/extension/vimServer/337a4193-de37-43c0-90ab-08d082766c96"/>
               datastore-10
               DATASTORE


               host-9
               HOST
          
           1
      
   
….....

You can see there is a lot of information returned about the VM such as configurations and settings, but it also includes the vCloud Extension information that contains details about the underlying vSphere properties such as the vSphere VM MoRef ID, Datastore and ESXi host managing the VM. The two properties that we should key on is highlighted: vmext:MoRef and vmext:VimServerRef. The latter property provides information about the vCenter Server that is currently managing the VM in question. We need to perform one additional query using it's href property.  

To get details about the vCenter Server, we will perform another GET operation using the vCenter Server href URL provided from the last example:

$ curl -i -k -H "Accept:application/*+xml;version=1.5" -H "x-vcloud-authorization: q7uX9eIAWQ0FegrrskkvTOPXiAo31wESTJ6ah5FRyE0=" -X GET https://vcd/api/admin/extension/vimServer/337a4193-de37-43c0-90ab-08d082766c96

HTTP/1.1 200 OK
Date: Wed, 08 Feb 2012 23:29:14 GMT
Content-Type: application/vnd.vmware.admin.vmwvirtualcenter+xml;version=1.5
Date: Wed, 08 Feb 2012 23:29:14 GMT
Content-Length: 3212

….....
    root
    https://10.20.183.48:443
    true
    true
    10.20.183.95
    admin
    9B6C7A60-C60F-4C1D-A607-0A0CFA2C2D5A
….....

The results will provide details about the vCenter Server and vShield Manager. You will see two properties of interest as highlighted above: Uuid and Url. This is the instanceUUID and URL of the vCenter Server that can then be used inconjunction with the VM's MoRef ID to map a VM in vCloud Director back to vSphere vCenter Server.

To come full circle, let's take a look at what the vSphere environment now looks like after we had imported the two VMs earlier.

As you can see, our VM display name has slightly changed in vSphere. The reason for this is vCloud Director automatically appends the unique UUID that is generated to the VM name as a way to uniquely display the objects. You can easily generate the VM href property for vCloud Director by just looking at the UUID in the parenthesis (e.g. https://vcd/..../vm-UUID)

To complete the correlation, we will perform the same vSphere query as we did earlier to confirm the vCenter Server instanceUUID and VM's MoRef that we found in our vCloud Director environment.

Here is the Perl script running against the westcoast-vcenter:
$ ./vmMoRefFinder.pl --server westcoast-vcenter --username root --name "MyVM1 (51201e8b-f910-40ab-b2b1-e5365a72f353)"

Name: MyVM1 (51201e8b-f910-40ab-b2b1-e5365a72f353)
VM MoRef: vm-14
VM InstanceUUID: 501b8bde-95da-472a-4d2d-9d97ea394bbc
vCenter Name: westcoast-vcenter
vCenter InstanceUUID: 9B6C7A60-C60F-4C1D-A607-0A0CFA2C2D5A

Here is the Perl script running against the westcoast-vcenter:
$ ./vmMoRefFinder.pl --server eastcoast-vcenter --username root --name "MyVM2 (ab59412f-b6c8-424d-bc0e-1414e1341084)"

Name: MyVM2 (ab59412f-b6c8-424d-bc0e-1414e1341084)
VM MoRef: vm-14
VM InstanceUUID: 502fb1ca-e9b8-82ae-3f9f-4a3ba85f081d
vCenter Name: eastcoast-vcenter
vCenter InstanceUUID: 63D30391-44E2-447E-A709-9DD1241C3DCC

Here is the PowerCLI script running when connected to both vCenter Servers:

Name                     : MyVM1
VM MoRef             : vm-14
VM InstanceUUID      : 501b8bde-95da-472a-4d2d-9d97ea394bbc
vCenter Name         : westcoast-vcenter
vCenter InstanceUUID : 9B6C7A60-C60F-4C1D-A607-0A0CFA2C2D5A

Name                     : MyVM2
VM MoRef             : vm-14
VM InstanceUUID      : 502fb1ca-e9b8-82ae-3f9f-4a3ba85f081d
vCenter Name         : eastcoast-vcenter
vCenter InstanceUUID : 63D30391-44E2-447E-A709-9DD1241C3DCC

Hopefully this example provided concrete details on how to uniquely identify a VM in a vSphere, vCloud or combination of the two environments. Though we used the vSphere SDK for Perl, PowerCLI 5.0.1 and the vCloud REST API in the examples above, this information can be obtained using any of our vSphere SDKs and vCloud SDKs.

Get notification of new blog postings and more by following VMware Automation on Twitter:  @VMWAutomation

Nexus 1000V v1.5 Technical Deep Dive

You will learn about the latest new technical features and benefits of the just released
Nexus 1000V v1.5. Also check out this video Video - Cisco Nexus 1000V v1.5 Installation.


Mike Yallits
mikeyallits@westco.ca

Disable ballooning?

Original Post: http://blogs.vmware.com/vsphere/2012/02/disable-ballooning.html

During Partner Exchange I've had multiple discussions about disabling ballooning, specifically about the recommendation of disabling ballooning when running particular workloads such as SQL and Oracle.  The goal of this recommendation usually is to stop the VMkernel from reclaiming memory but unfortunately this will not happen. This article describes why ballooning is helpful and how to achieve your goals by utilizing other resource management settings.

Let's stress the most important bit immediately: Disable the ballooning mechanism does not disable memory reclamation. It will just disable the most intelligent mechanism of the entire memory management stack.


Why is disabling the ballooning mechanism bad?
Many organizations that deploy virtual infrastructures rely on memory over-commitment to achieve higher consolidation ratios and higher memory utilization. In a typical virtual infrastructure not every virtual machine is actively using its assigned memory at the same time and not every virtual machine is making use of its configured memory footprint.

To allow memory over-commitment, the VMkernel uses different virtual machine memory reclamation mechanisms:

  1. Transparent Page Sharing
  2. Ballooning
  3. Memory compression
  4. Host swapping

Except from Transparent Page Sharing, all memory reclamation techniques only become active when the ESXi host experiences memory contention. The VMkernel will use a specific memory reclamation technique depending on the level of the host free memory. When the ESXi host has 6% or less free memory available it will use the balloon driver to reclaim idle memory from virtual machines. The VMkernel selects the virtual machines with the largest amounts of idle memory (detected by the idle memory tax process) and will ask the virtual machine to select idle memory pages.

To fully understand the beauty of the balloon driver, it's crucial to understand that the VMkernel is not aware of the Guest OS internal memory management mechanisms. Guest OS's commonly use an allocated memory list and a free memory list. When a guest OS makes a request for a page, the VMkernel will back that "virtual" page with physical memory. When the guest OS stops using the page internally, it does not remove the data, the guest OS just removes the address space pointer from the allocated memory list and places this pointer on the free memory list. Because the data itself has not changed, ESX will remain keeping this data in physical memory.

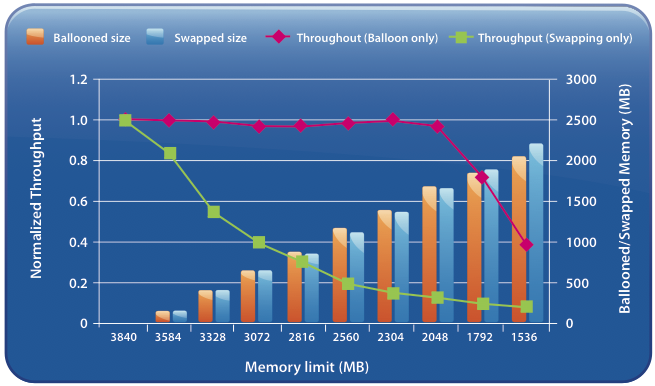
When the Balloon driver is utilized, the balloon driver request the guest OS to allocated a certain amount of pages. Typically the guest OS will allocate memory that has been idle or registered in the guest OS free list. If the virtual machine has enough idle pages no guest-level paging or even worse kernel level paging is necessary. Scott Drummonds tested an Oracle database VM against an OLTP load generation tool and researched the (lack of) impact of the balloon driver on the performance of the virtual machine. The results are displayed in this image:

Picture-2
Impact on performance: Ballooning versus swapping

Scott's explanation:
Results of two experiments are shown on this graph: in one memory is reclaimed only through ballooning and in the other memory is reclaimed only through host swapping. The bars show the amount of memory reclaimed by ESX and the line shows the workload performance. The steadily falling green line reveals a predictable deterioration of performance due to host swapping. The red line demonstrates that as the balloon driver inflates, kernel compile performance is unchanged.


So the beauty of ballooning lies in the fact that it allows the guest OS itself to make the hard decision about which pages to be paged out without the hypervisor's involvement. Because the guest OS is fully aware of the memory state, the virtual machine will keep on performing as long as it has idle or free pages.

When ballooning is disabled
When we follow the recommendations of disabling the balloon driver the VMkernel can use the following memory reclamation techniques:

  1. Transparent Page Sharing
  2. Memory compression
  3. Host-level swapping (.vswp)

Memory compression
Memory compression was introduced in vSphere 4.1. The VMkernel will always try to compress memory before swapping. This feature is very helpful and a lot faster than swapping. However, the VMkernel will only compress a memory page if it can reach a compression ratio of 50% or more, otherwise the page will be swapped. Furthermore, the default size of the compression cache is 10%, if the compression cache is full, one compressed page must be replaced in order to make room for a new page. The older pages will be swapped out. This means that during heavy contention memory compression will become the first stop before ultimately ending up as a swapped page.

Increasing the memory compression cache can have a contradictive effect, as the memory compression cache is a part of the virtual machine memory usage, it can introduce memory pressure or contention due to configuring large memory compression caches.

Host-level Swapping
Contrary to ballooning, host-level swapping does not communicate with the guest OS. The VMkernel has no knowledge about the status of the page in the guest OS only that the physical page belongs to a specific virtual machine. Because the VMkernel is unaware of the content of the stored data inside the page and its significance to the guest OS, it could happen that the VMkernel decides to swap out guest OS kernel pages. The guest OS will never swap kernel pages as they are crucial to maintaining kernel performance.

By disabling ballooning, you have just deactivated the most intelligent memory reclamation technique. Leaving the VMkernel with the option to either compress a memory page or just rip out complete random (crucial) pages, significantly increasing the possibility of deteriorating the virtual machine performance. Which to me does not sound something worth recommending.

How to guarantee performance without disabling the balloon driver?
The best option to guarantee performance is to use the resource allocation settings; shares and reservations.

Shares:

Use shares to define priority levels and use reservations to guarantee physical resources even when the VMkernel is experiencing resource contention.

Reservation
A reservation specifies the guaranteed minimum allocation for a virtual machine. This means that the VMkernel does not reclaim physical memory if it is protected by a reservation, even if there is contention. This physical memory will be available to that specific virtual machine at all times. In essence, by appling memory reservation to a virtual machine, you are disabling memory reclamation for that chunk of virtual machine memory.

Additional information about reservations:

However setting reservations will impact the virtual infrastructure, a well know impact of setting a reservation is on the HA slot size if the cluster is configured with "Host failures cluster tolerates". More info on HA can be found in the HA deep dive on yellow-bricks. To circumvent this impact one might choose to configure the HA cluster with the HA policy "Percentage of cluster resources reserved as fail over spare capacity". Due to the HA-DRS integration introduced in vSphere 4.1 the main caveat of dealing with defragmented clusters is dissolved.

Conclusion
Disabling the balloon-driver will likely worsen the performance of the virtual machine and drives the problem down the stack. If you want to disable memory reclamation for that virtual machine, apply reservations.

Digging deeper into the VDS construct

Original Post: http://www.yellow-bricks.com/2012/02/23/digging-deeper-into-the-vds-construct/

The following comment was made on my VDS blog and I figured while would investigate this a bit further:

It seems like the ESXi host only tries to sync the vDS state with the storage at boot and never again afterward. You would think that it would keep trying, but it does not.

Now lets look at the "basics" first. When an ESXi host boots it will get the data required to recreate the VDS structure locally by reading /etc/vmware/dvsdata.db and from esx.conf. You can view the dvsdata.db file yourself by doing:

net-dvs -f /etc/vmware/dvsdata.db

But is that all that is used? If you check the output of that file you will see that all data required for a VDS configuration to work is actually stored in there, so what about those files stored on a VMFS volume?

Each VMFS volume that holds a working directory (place where .vmx is stored) for at least 1 virtual machine that is connected to a VDS will have the following folder:

drwxr-xr-x    1 root     root          420 Feb  8 12:33 .dvsData

If you go to this folder you will see another folder. This folder appears to be some sort of unique identifier, and when comparing the string to the output of "net-dvs" it appears to be the identifier of the dvSwitch that was created.

drwxr-xr-x    1 root     root         1.5k Feb  8 12:47 6d 8b 2e 50 3c d3 50 4a-ad dd b5 30 2f b1 0c aa

Within this folder you will find a collection of files:

-rw------- 1 root root 3.0k Feb 9 09:00 106  -rw------- 1 root root 3.0k Feb 9 09:02 136  -rw------- 1 root root 3.0k Feb 9 09:00 138  -rw------- 1 root root 3.0k Feb 9 09:05 152  -rw------- 1 root root 3.0k Feb 9 09:00 153  -rw------- 1 root root 3.0k Feb 9 09:05 156  -rw------- 1 root root 3.0k Feb 9 09:05 159  -rw------- 1 root root 3.0k Feb 9 09:00 160  -rw------- 1 root root 3.0k Feb 9 09:00 161

It is no coincidence that these files are "numbers" and that these numbers resemble the port ID of the virtual machines stored on this volume. This is the port information of the virtual machines which have their working directory on this particular datastore. This port info is also what HA uses when it needs to restart a virtual machine which uses a dvPort. Let me emphasize that, this is what HA uses when it needs to restart a virtual machine! Is that all?

Well I am not sure. When I tested the original question I powered on the host without access to the storage system and powered on my storage system when the host was fully booted. I did not get this confirmed, but it seems to me that access to the datastore holding these files is somehow required during the boot process of your host, in the case of "static port bindings" that is. (Port bindings are more in-depth described here.)

Does this imply that if your storage is not available during the boot process virtual machines cannot connect to the network when they are powered on? Yes that is correct, I tested it and when you have a full power-outage and your hosts come-up before your storage you will have a "challenge". As soon as the storage is restored you probably will want to restart your virtual machines but if you do you will not get a network connection. I've tested this 6 or 7 times in total and not once did I get a connection.

As a workaround you can simply reboot your ESXi hosts. If you reboot the host the problem is solved and your virtual machines can be powered on and will get access to the network. Rebooting a host can be a painfully slow exercise though, as I noticed during my test runs in my lab. Fortunately there is a really simple workaround: restarting the management agents! Before you power-on your virtual machines and after your storage connection has been restored do the following from the ESXi shell:

services.sh restart

After the services have been restarted you can power-on your virtual machines and network connection will be restored!

Side note, on my article there was one question about the auto-expand property of static port groups and whether this was officially supported and where it was documented. Yes it is fully supported. There's a KB Article about how to enable it and William Lam recently blogged about it here. That is it for now on VDS…

Wednesday 22 February 2012

Webinar: How to Assess the Security of Your Virtualized Data Center with Metasploit

Rapid7 Presents:

How to assess the security of your virtualized data center with Metasploit

March 21, 2012 – 2:00 – 3:00 EDT


Security assessments often treat virtual machines in the same way as physical machines since they share the same weaknesses. However, virtualization technology can also introduce new security risks if not properly deployed that leave organization open to attacks.

In this webcast for IT security professionals and network engineers, David Maloney shows gives some background on new techniques, including a live demo. Participants will learn how to:

• Identify potential security risks in virtual environments
• Scan and discover virtual hosts and guests
• Take screenshots of guest operating systems
• Uncover weak passwords of virtualization technology services
• Bring virtual machines online to compromise a network
• Secure a virtual environment against cyber attacks


Register Here:  https://www3.gotomeeting.com/register/705059470

Video - Cisco Nexus 1000V Release 4.2(1)SV1(5.1) Installation


The Cisco Nexus 1000V is compatible with any upstream physical access layer switch that is Ethernet standard compliant, including the Catalyst 6500 series switch, Cisco Nexus switches, and switches from other network vendors. The Cisco Nexus 1000V is compatible with any server hardware listed in the VMware Hardware Compatibility List (HCL). Cisco and VMware jointly designed APIs that produced the Cisco Nexus 1000V. The Cisco Nexus 1000V is a distributed virtual switch solution that is fully integrated within the VMware virtual infrastructure, including VMware vCenter for the virtualization administrator. This solution offloads the configuration of the virtual switch and port groups to the network administrator to enforce a consistent data center network policy. In this release Java applications are introduced for VSM and VEM installation.

For the Virtual Supervisor Module (VSM)—The control plane of the switch and a virtual machine that runs Cisco NX-OS, just download the Nexus1000v.4.2.1.SV1.5.1.zip file and enter the following command from a Windows, Linux, or Mac command prompt:

java -jar zip_file_location/Nexus1000v.4.2.1.SV1.5.1/VSM/Installer_App/Nexus1000V-install.jar VSM

For the Virtual Ethernet Module (VEM)—A virtual line card embedded in each VMware vSphere (ESX) host. The VEM is partly inside the kernel of the hypervisor and partly in a user-world process, called the VEM Agent. Enter the following command from a Windows, Linux, or Mac command prompt:

java -jar zip_file_location/Nexus1000v.4.2.1.SV1.5.1/VSM/Installer_App/Nexus1000V-install.jar VEM

Cisco Nexus 1000V Series Switches - Configuration Guides

Cisco Virtual Security Gateway for Cisco Nexus 1000V Series Switches Data Sheet

Original Blog: http://feedproxy.google.com/~r/Ntpronl/~3/_j7iNKHJeyg/1981-Video-Cisco-Nexus-1000V-Release-4.21SV15.1-Installation.html

Interesting storage stuff from VMware Partner Exchange 2012

Original Blog: http://blogs.vmware.com/vsphere/2012/02/interesting-storage-stuff-from-vmware-partner-exchange-2012.html

I had the pleasure of attending the VMware Partner Exchange this year. I delivered a deep dive presentation on VMware's Storage Appliance (the pdf can be found here), as well as an overview of the features going into the next version of the VSA. I can't discuss these features with you just yet, but rest assured I will be doing a number of posts on the new features as soon as I have permission to do so.

Like other conferences that I get invited to, I always try to take a look around the Solutions Exchange and see what cool things are going on in the storage space. This post simply discusses some of the new and interesting products/features that I've seen from our partners at PEX. It is no way all-encompassing, as I didn't get to see everyone. Hopefully you'll find it interesting all the same.


Disclaimer - Once again, (I am sure that you are fed up with me repeating this message at this stage) the vSphere storage blog has to remain storage vendor neutral to retain any credibility. VMware doesn't favour any one storage partner over another. I'm not personally endorsing any of these vendor's products either. What I'm posting here is what I learnt about the products and features at the sessions & something which I hope you find interesting too.


My first stop off was to the Atlantis Computing stand to find out more about their new VDI Performance Accelerator product called ILIO. I'm taking a bit of poetic license by including it in 'storage', but it addresses an area that is of concern right now in the VDI space. This is a product that VDI folks have been getting very excited about. I spoke to Joshua Petty, Director of Systems Engineering at Atlantis. He told me that the ILIO software appliance (virtual machine), which sits in the I/O path between your hypervisor and storage, will increase your VDI performance 10 fold, allowing up to 4-7 times more desktops per host.The ILIO also does inline deduplication, reducing storage capacity for each desktop by up to 99%. This is all very impressive. Since the appliance sits in the I/O path, it presents an iSCSI or NFS datastore at the front-end to the hypervisor, and at the backend, it is presented with NFS, iSCSI or Fibre Channel storage from the storage array.The appliance then sits in the middle, doing its dedupe & acceleration bit.

The one concern I did have is what happens to I/O in flight should this appliance fail. It would appear that Atlantis offer the ILIO in both fault tolerant and high availability configurations. They can also create a synchronous FT cluster of Atlantis ILIO virtual machines on separate physical hosts. There certainly seems to be a lot of interest brewing in this technology. More here at http://www.atlantiscomputing.com/products/


During this trip, I also managed to meet up with Martin Lister, who heads up the Rapid Desktop Program at VMware. I did a previous post about this program where I describe how Pivot3 on boarded very quickly, and appeared to have gained a lot of traction as a result of their participation in this program. It was great to again meet with Lee, Olivier, Mike and the rest of the Pivot3 guys at PEX and hear how well things are going for them in the VDI space.

Martin also told me that a number of other VMware storage partners are readying themselves to certify very soon in this program. Certified partners then get listed in the VMware HCL under the category VMware View POC Solutions.

Note however that the program is not directed at storage vendors, but is aimed at solution providers. The partner becomes the one-stop-shop for a complete VDI solution that has been fully tested & then certified by VMware. This includes the hypervisor, storage & VDI. The RDP certified partner will have to follow strict criteria for ease of roll-out/deployment of the VDI solution, as well as provide a solution that can host a defined number of View desktops. Pivot3 also did a presentation at PEX around their VDI solution which was very well received. Unfortunately I missed it myself, but I've since heard that there was a lot of interest in their solution.

I'm hoping to do a follow up post shortly detailing some of the new partners that are certifying on this program. Its definitely going from strenght to strength.

My final update is around a new partner called Starboard Storage Systems. These were the new kids on the block at PEX 2012, and after chatting with Tony Lagera, one of Starboard's Regional Sales Managers, it would appear that these guys have just recently come out of stealth mode. It looks like their play is to make the management of mixed workload environments much simpler, and allow a vSphere admin who may not have in-depth storage knowledge to easily manage their storage infrastructure on a per application basis. If I understood correctly, their array implements tiering to achieve this - what Starboard are calling their Mixed-workload, Application-Crafted Storage Tiering (MAST) architecture. This replaces a RAID configuration found in traditional arrays. Starboard state that this reduces a lot of complexity involved in setting up the correct type of storage for your application. Their AC72 storage system also comes with an SSD tier for improved performance, and supports connectivity across multiple storage protocols including NFS, iSCSI, and Fibre Channel.

Not sure about VAAI support, or if there is a vCenter plugin for management at this time. I'll have to keep an eye out for these guys at future conferences. More about them here - http://www.starboardstorage.com/

Get notification of these blogs postings and more VMware Storage information by following me on Twitter: @VMwareStorage

Tuesday 21 February 2012

My VMware Beta is Live - and it looks pretty good


My VMware Beta is now live!  To access Beta, please click here and log in using your vmware.com username and password. 

The goal of Beta is to ease your transition to My VMware and identify any issues you may experience. My VMware Beta sandbox is a temporary environment which provides an opportunity for you to interact with, explore, and experience the new My VMware site. You will be able to view your own data and see how it will be organized prior to launch of My VMware. We look forward to receiving your feedback on the site’s ease of use and the way your data is displayed.

Changes made in the My VMware Beta sandbox environment will not be retained. This includes any new licenses keys that are created; they will not be invalid in your production systems. During Beta, our support team can assist with changes to how your data is organized before we launch My VMware.  Please note that while you can go through the steps of filing a Support Request in the Beta sandbox, the information will not be saved and no action will be taken.  Please contact our Beta support team with any questions. 

If you haven’t done so already, be sure to join our Beta community where we will continue to share additional information on the Beta program and My VMware with you.

We appreciate your time and support. 

Sincerely,
The My VMware Team
Online Version

Sunday 19 February 2012

Technical Marketing Update 2012 - Week 07

By Duncan Epping, Principal Architect, VMware.

Technical Marketing Update 2012 - Week 07:

This week most of us attended VMware Partner Exchange and presented various sessions. I must say that PEX was a great event and I heard a lot of good stories about the sessions and labs. Well organized by the PEX team and I hope I will be able to attend again next year. The list of articles a bit smaller than normally due to PEX, but nevertheless worth posting. We will be back to full speed again next week...

Blog posts:

Saturday 18 February 2012

iSCSI Advanced Settings

I've had a few questions recently about some of the iSCSI configuration parameters found in the Advanced Settings.

Iscsi-advanced

When iSCSI establishes a session between initiator and target, it has to login to the target. It will try to login for a period of LoginTimeout. If that exceeds, the login fails.

When iSCSI finishes a session between initiator and target, it has to logout of the target. It will try to logout for a period of LogoutTimeout. If that exceeds, the logout fails.

The other options relate to how we determine a DEAD PATH:

  1. RecoveryTimeout is used to determine how long we should wait before placing a path into a DEAD_STATE when the path was active, but now no PDUs are being sent or received. Realistically it's a bit longer than that, as other considerations are taken into account as well.
  2. The noop settings are used to determine if a path is dead, when it is not the active path. iSCSI  will passively discover if this path is dead by using the noop timeout. This test is carried out on non-active paths every NoopInterval, and if a response isn't received by NoopTimeout, the path is marked as DEAD.

Unless you wanted faster failover times, you probably wouldn't ever need to edit these. But be careful because if you have paths failing too quickly and then recovering, you could have LUNs/devices moving unnecessarily between array controller targets which could lead to path thrashing.

Get notification of these blogs postings and more VMware Storage information by following me on Twitter: Twitter @VMwareStorage

Options for becoming a VCP 5.0

Andy CaryVMware's Andy Cary who works as a Senior Technical Trainer in EMEA has  received a lot of e-mails recently about what the options are for people to secure their VCP5.0. The table in the diagram below shows the 4 different options for attaining your VCP 5.0 exam. Andy thinks there's confusion with the text in printed orange, this text is only valid until the 29th February. So at the 1st March all the orange options will have disappeared from the diagram.
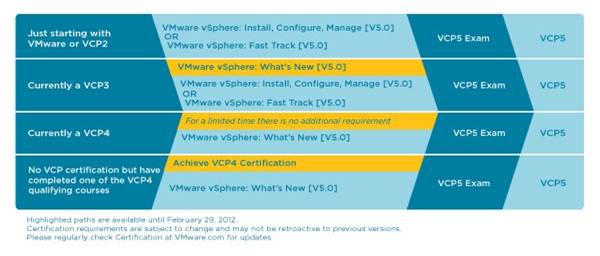
Here's Andy's explanation regarding the four different layers for achieving a VCP5.0

Option 1 - Just Starting with VMware or VCP 2

Another way of saying this is there is no upgrade path from VCP2 to VCP5 and the student hasn't attend any vSphere 4.0 or 5.0 classes. So in this case the student must attend a vSphere 5.0 qualifying class =  vSphere 5 Install Configure and Manage or vSphere 5 Fasttrack and take the VCP5.0 – no deadline for when they have to take the exam

Option 2 - Currently a VCP3

So now if a student is a VCP3 they can take the VCP5.0 exam if:-

1. Attend the vSphere 5.0 What's New class and take the VCP 5.0 exam by the 29th February – they won't be able to take the exam after 29th February if this the only training they have attended.

2. Attend vSphere 5 Install Configure and Manage or vSphere 5 Fasttrack and take the VCP5.0 exam – there is no deadline for when they have to take the VCP5.0 exam

Option 3 - Currently a VCP4.0

Go take the VCP5.0 exam by 29th February. If a student in this situation wants to become a VCP5.0 after the 29th Feb they have to attend a vSphere 5.0 What's New class.

Option 4 - No VCP Certification but have completed one of the VCP4 qualifying classes


In this example a student has attend let's say the vSphere 4.x ICM class but they haven't passed any VCP exams.

1. A student will be allowed to take the VCP4.0 exam and then VCP5.0 exam to get the VCP5.0 BUT they must pass the VCP5.0 exam by the 29th February

2. A student will also be allowed to take their VCP5.0 exam (without taking VCP4.0) if they have attend the vSphere 5.0 What's New class – again no deadline for taking the VCP5.0 exam

So if student in this situation passes their VCP4 exam today, they must pass their VCP5.0 exam by the end of February. If they don't pass by 29th Feb they are effectively at Option 3 and they have to attend vSphere 5.0 What's New class

Video - Scripted ESXi Installation


Scripted installation is an efficient way to provision multiple ESXi host. This video explains how to use a kickstart file to install or upgrade ESXi. Both Shift-O invocation and PXE boot are supported.

Thursday 16 February 2012

VMware vExperts 2012 Nominations Open

This years round of vExperts nominations has opened for 2012…

You can nominate yourself or a colleague here:

There are three new paths to becoming a vExpert:

Evangelist Path
The Evangelist Path includes book authors, bloggers, tool builders, public speakers, and other IT professionals who share their knowledge and passion with others with the leverage of a personal public platform to reach many people. Employees of VMware can also apply via the Evangelist path.

Customer Path
The Customer Path is for internal evangelists and community leaders from VMware customer organizations. They have contributed to success stories, customer references, or public interviews and talks, or were active community contributors, such as VMUG leaders.

VPN (VMware Partner Network) Path
The VPN Path is for employees of our partner companies who lead with passion and by example, who are committed to continuous learning and to making their technical knowledge and expertise available to many. This can take shape of event participation, video, IP generation, as well as public speaking engagements.


Mike Yallits
mikeyallits@westco.ca